Introduction
Maintaining optimal soil moisture levels is crucial for healthy plant growth. Overwatering or underwatering can lead to plant diseases and reduced growth. An Arduino soil moisture sensor can help automate plant care by monitoring the soil’s moisture level and triggering a plant watering system when needed. In this blog, we will explore how to use an Arduino soil moisture meter to create an automatic watering system for plants. We’ll also provide Arduino code for the soil moisture sensor to get you started.
Components Required
To build this smart watering system, you will need the following components:
- Arduino Board (Uno, Nano, or Mega)
- Soil Moisture Sensor Module
- Relay Module (5V)
- Water Pump (5V or 12V DC)
- Jumper Wires
- Power Source (Battery or Adapter)
- Plastic Tubing (for water delivery)
- Breadboard (optional)
Understanding the Soil Moisture Sensor
A soil sensor Arduino module typically consists of two probes that measure soil moisture levels by detecting changes in resistance. The drier the soil, the higher the resistance. This sensor provides both analog and digital output, making it easy to integrate with an Arduino soil moisture meter system.
How It Works
- Analog Mode: Provides a variable value based on soil moisture.
- Digital Mode: Uses a preset threshold and outputs HIGH or LOW.
For better accuracy, using the analog output is recommended.
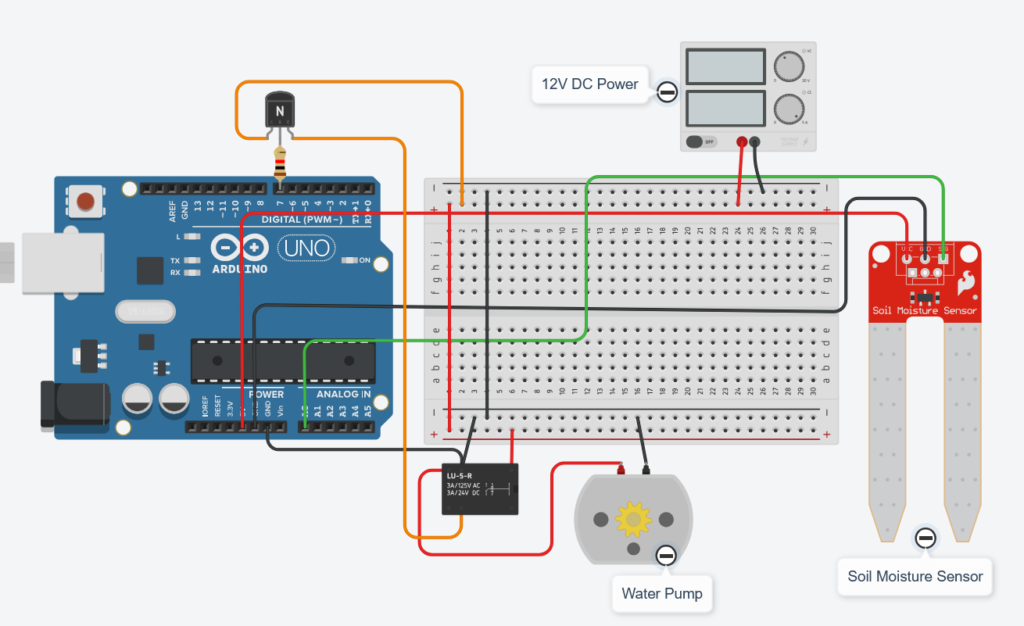
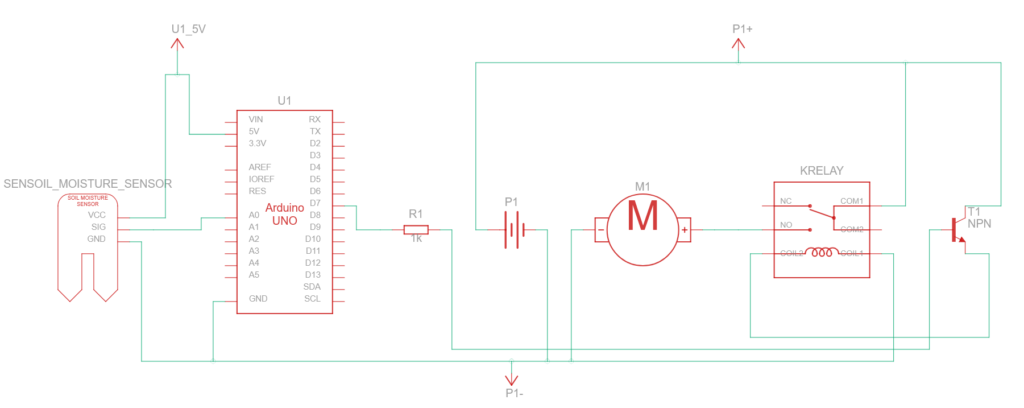
Wiring the Soil Moisture Sensor with Arduino
Follow this wiring guide to connect your sensor to the Arduino:
- Soil Moisture Sensor
- VCC → 5V (Arduino)
- GND → GND (Arduino)
- A0 → A0 (Arduino) [For Analog Readings]
- Relay Module
- VCC → 5V (Arduino)
- GND → GND (Arduino)
- IN → Digital Pin (e.g., D7)
- Water Pump
- Connect the positive terminal to the relay’s NO (Normally Open) pin.
- Connect the negative terminal to GND.
If you are not familiar with how to use relay, then you can visit the article given below:
How to use relay without microcontroller [with battery and bulb/LED]
Arduino Code for Soil Moisture Sensor
Upload the following Arduino code for the moisture sensor to monitor and control the water pump based on soil moisture readings.
#define sensorPin A0    // Soil moisture sensor connected to A0
#define relayPin 7      // Relay connected to pin 7

int moistureLevel;
int threshold = 400; // Adjust based on your soil type

void setup() {
    Serial.begin(9600);
    pinMode(relayPin, OUTPUT);
    digitalWrite(relayPin, HIGH); // Ensure pump is off initially
}

void loop() {
    moistureLevel = analogRead(sensorPin);
    Serial.print("Soil Moisture: ");
    Serial.println(moistureLevel);

    if (moistureLevel < threshold) {
        digitalWrite(relayPin, LOW); // Turn on pump
        Serial.println("Watering the plant...");
    } else {
        digitalWrite(relayPin, HIGH); // Turn off pump
        Serial.println("Soil moisture is adequate.");
    }
    delay(2000); // Wait for 2 seconds before next reading
}
Explanation of the Code
- Reads the soil moisture level from the sensor.
- Compares it with a predefined threshold.
- If the moisture is below the threshold, the pump turns on.
- If moisture is sufficient, the pump remains off.
- The system checks the moisture level every 2 seconds.
Enhancing the System
1. Adjusting the Threshold
- Different soil types retain water differently.
- Test your sensor in wet and dry soil to find the optimal threshold value.
2. Adding an LCD Display
To display real-time moisture levels:
- Use an I2C LCD display.
- Modify the code to print values on the LCD.
3. Using a Battery-Powered System
- Use a 12V battery with a voltage regulator to make the system portable.
- Ensure power efficiency by optimizing code and components.
4. Integrating IoT Features
For remote monitoring:
- Use a Wi-Fi module (ESP8266 or ESP32).
- Send soil moisture data to a mobile app or web dashboard.
Testing and Calibration
- Insert the sensor into dry soil and note the reading.
- Water the soil and take a moisture reading.
- Adjust the threshold value accordingly in the code.
- Test the system by drying and moistening the soil.
Common Issues and Solutions
| Issue | Solution |
|---|---|
| Sensor values fluctuate | Use averaging techniques in the code. |
| Pump not turning on | Check relay wiring and threshold value. |
| Sensor corrosion | Use capacitive sensors for longevity. |
| Excess water output | Adjust the relay duration to control watering. |
Conclusion
With an Arduino soil moisture sensor, you can create an automated plant watering system that ensures plants receive the right amount of water. By modifying the Arduino code for the moisture sensor, adding IoT capabilities, and integrating an LCD display, you can further enhance your setup. This project is great for home gardens, greenhouses, and smart agriculture applications. Start building your Arduino soil moisture meter today and make plant care effortless!
Pingback: Smart Street Light using Arduino and PIR Sensor - TechKnowLab
Pingback: BMP280 Sensor for Barometric Pressure and Altitude - TechKnowLab
Туры Fun Sun: отправляйтесь в Турцию с комфортом, позвольте себе.
Туроператор Сан Фан туры в Турции из Москвы https://www.bluebirdtravel.ru .
Pingback: Solar Powered Automatic Plant Watering System - TechKnowLab