The HC-SR04 Arduino combination is a popular choice for projects involving distance measurement, obstacle detection, and automation. This ultrasonic sensor is known for its accuracy, simplicity, and affordability, making it a favorite among hobbyists and professionals alike. In this comprehensive guide, we’ll dive deep into what the HC-SR04 is, its specifications, how to interface it with an Arduino, and provide detailed code examples.
What is HC-SR04 Arduino?
The HC-SR04 is an ultrasonic sensor commonly used in robotics, automation systems, and various other electronic projects. It works by emitting ultrasonic sound waves and measuring the time it takes for the sound to bounce back after hitting an object. By calculating this time delay, the sensor can determine the distance to the object.
When paired with an Arduino, the HC-SR04 becomes a powerful tool for distance measurement, enabling projects such as obstacle-avoiding robots, liquid level detectors, and parking assistance systems.
Is HC-SR04 5V or 3.3V?
The HC-SR04 operates on a 5V power supply. It is designed to be powered by a 5V source, and its trigger and echo pins also work at 5V logic levels.
Important Note:
- While the HC-SR04 requires 5V, it can still be interfaced with 3.3V microcontrollers (like the Arduino Nano 33 IoT or ESP8266) by using a voltage divider on the echo pin to protect the microcontroller from the 5V output.
- The trigger pin can safely be controlled by a 3.3V output, as it only needs a high signal to initiate a pulse.
What is the Range of HC-SR04?
The HC-SR04 has an effective range of:
- 2 cm to 400 cm (0.79 inches to 13 feet)
- Accuracy: ±3 mm
This makes it ideal for short to medium-range distance measurements. However, it may not perform well on extremely soft surfaces (like cloth) or very thin objects due to the poor reflection of ultrasonic waves.
How Does HC-SR04 Work?
The HC-SR04 ultrasonic sensor consists of:
- Trigger Pin (Trig): Sends a high-frequency ultrasonic pulse.
- Echo Pin: Receives the reflected pulse.
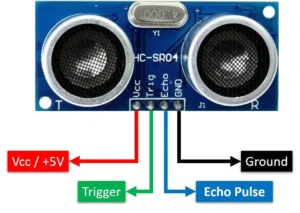
- VCC: Power supply (5V).
- GND: Ground.
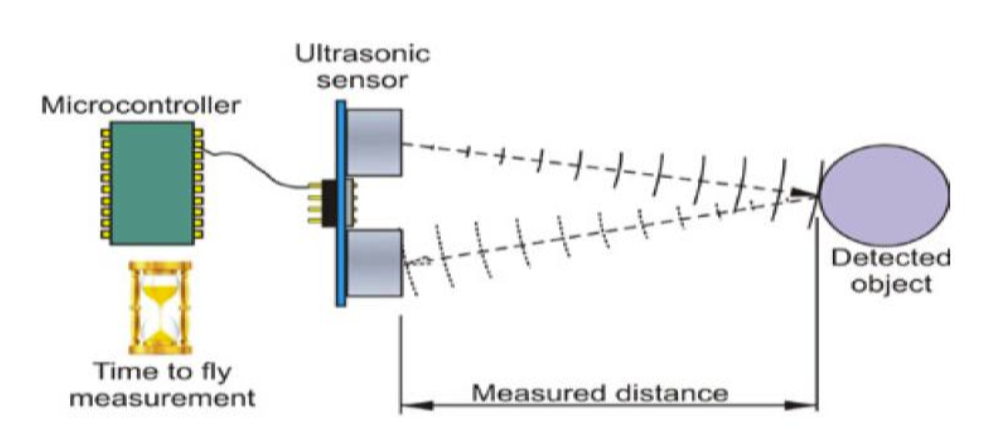
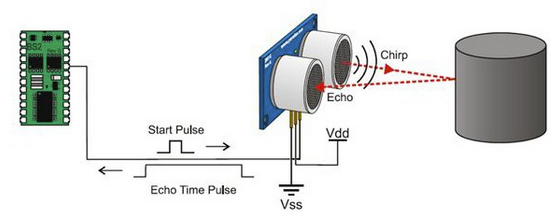
Working Principle:
- Trigger Pulse: A 10µs high pulse is sent to the Trig pin.
- Ultrasonic Wave Emission: The sensor emits an 8-cycle burst of ultrasonic sound at 40 kHz.
- Echo Reception: If the sound wave hits an object, it reflects and is received by the Echo pin.
- Time Measurement: The Echo pin stays high for the duration of the time taken for the sound wave to return.
- Distance Calculation: Distance is calculated using the formula:
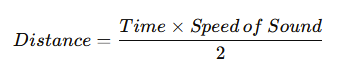
Where the speed of sound is approximately 343 m/s in the air.
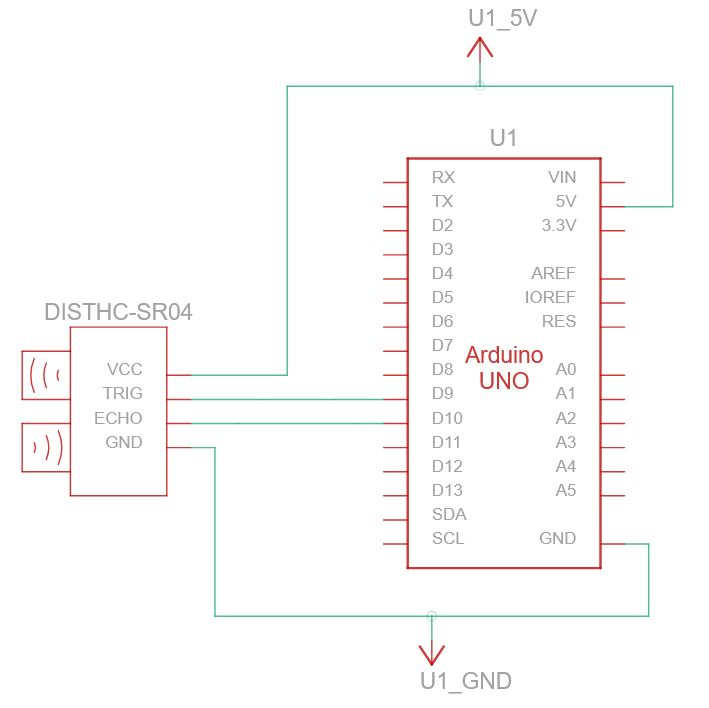
Wiring HC-SR04 with Arduino
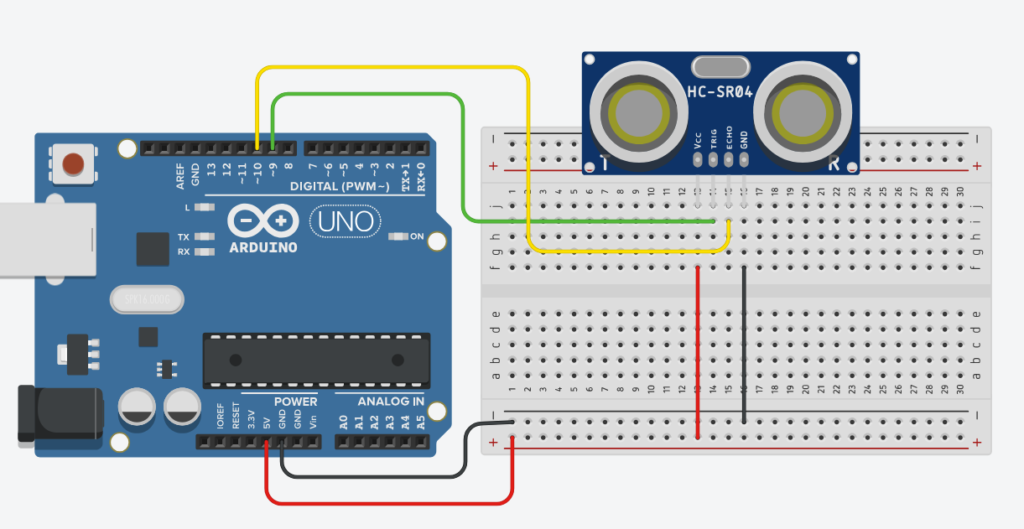
Connecting the HC-SR04 to an Arduino is straightforward:
| HC-SR04 Pin | Arduino Pin |
|---|---|
| VCC | 5V |
| GND | GND |
| Trig | Digital Pin 9 |
| Echo | Digital Pin 10 |
Ensure proper connections to avoid malfunction or damage to the sensor or microcontroller.
HC-SR04 Arduino Code
Here is a simple example of interfacing the HC-SR04 with an Arduino. This code measures the distance and displays it on the Serial Monitor.
const int trigPin = 9;
const int echoPin = 10;
long duration;
int distance;

void setup() {
  pinMode(trigPin, OUTPUT);
  pinMode(echoPin, INPUT);
  Serial.begin(9600);
}

void loop() {
  // Clear the trigger pin
  digitalWrite(trigPin, LOW);
  delayMicroseconds(2);

  // Set the trigger pin high for 10 microseconds
  digitalWrite(trigPin, HIGH);
  delayMicroseconds(10);
  digitalWrite(trigPin, LOW);

  // Read the echo pin and measure the time it takes for the pulse to return
  duration = pulseIn(echoPin, HIGH);

  // Calculate the distance
  distance = duration * 0.034 / 2;

  // Display the distance on the Serial Monitor
  Serial.print("Distance: ");
  Serial.print(distance);
  Serial.println(" cm");

  delay(500);
}
Explanation of the Code:
- The trigger pin sends a pulse, and the echo pin measures the time taken for the echo to return.
- The distance is calculated using the formula mentioned earlier.
- The result is displayed on the Serial Monitor.
HC-SR04 Arduino Library
For more advanced features, you can use the NewPing library. It simplifies the coding process and provides more accurate distance measurements.
Installing the Library:
- Go to Tools > Manage Libraries in the Arduino IDE.
- Search for NewPing and click Install.
Example Code Using NewPing Library:
#include <NewPing.h>

#define TRIG_PIN 9
#define ECHO_PIN 10
#define MAX_DISTANCE 400

NewPing sonar(TRIG_PIN, ECHO_PIN, MAX_DISTANCE);

void setup() {
  Serial.begin(9600);
}

void loop() {
  int distance = sonar.ping_cm();
  Serial.print("Distance: ");
  Serial.print(distance);
  Serial.println(" cm");
  delay(500);
}
Benefits of Using NewPing Library:
- Easier to use compared to manual pulse calculations.
- Non-blocking functions allow for other code to run simultaneously.
- More accurate readings with built-in error handling.
HC-SR04 Datasheet
To fully understand the specifications and operational details, referring to the HC-SR04 datasheet is essential. The datasheet provides:
- Electrical characteristics (e.g., operating voltage, current consumption).
- Pin configurations and descriptions.
- Timing diagrams for trigger and echo pulses.
- Mechanical dimensions for designing enclosures or mounts.
You can download the HC-SR04 datasheet from various electronics component suppliers or technical resources online.
Applications of HC-SR04 with Arduino
The versatility of the HC-SR04 Arduino combination makes it suitable for numerous applications:
- Obstacle Avoidance: In autonomous robots or drones.
- Distance Measurement: For parking assistance systems.
- Liquid Level Detection: In tanks or reservoirs.
- Security Systems: As motion detectors.
Troubleshooting Tips
- Incorrect Distance Readings:
- Ensure proper wiring and connections.
- Avoid obstacles or objects that absorb sound waves, like soft fabrics.
- No Output on Serial Monitor:
- Check the baud rate setting in the Serial Monitor (should be 9600).
- Verify power supply connections.
- Fluctuating Measurements:
- Use median filtering in code to stabilize readings.
Conclusion
The HC-SR04 Arduino combination offers a simple yet powerful way to measure distances in a variety of projects. Its ease of use, cost-effectiveness, and reliable performance make it a popular choice for beginners and professionals alike.
With the detailed examples, wiring guide, and troubleshooting tips provided in this article, you should now be well-equipped to incorporate the HC-SR04 ultrasonic sensor into your next Arduino project.
Further Resources
Happy Building!
Pingback: Smart Street Light using Arduino and PIR Sensor - TechKnowLab
Pingback: Practical Electronics for Beginners and Non Electronics Guys - TechKnowLab