ST7735 TFT Display Arduino Tutorial: Have you ever used electronics to make someone smile?
Most Arduino projects focus on sensors, automation, robotics, and IoT. But electronics can also be used to create memorable personal experiences. Imagine giving your spouse, partner, or loved one a small device that suddenly lights up with colorful hearts and a personalized message saying “I Love You.”
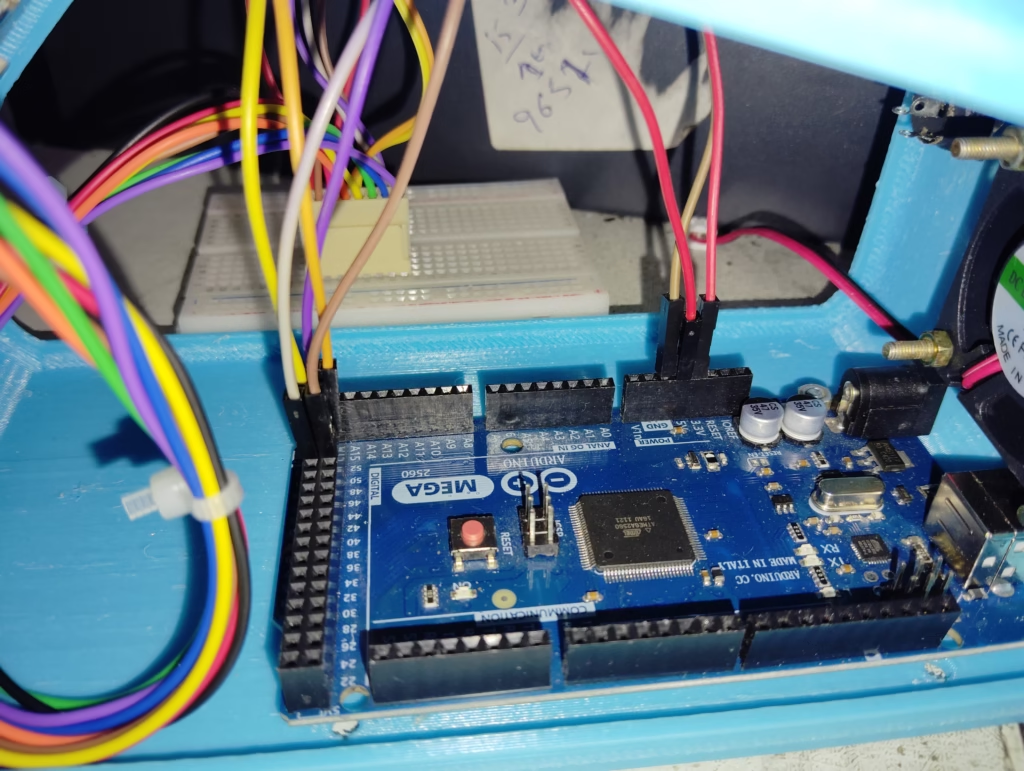
In this tutorial, you’ll learn how to interface a 1.8-inch ST7735 TFT display with an Arduino Mega and create beautiful graphics, text, animations, and finally a romantic animated greeting.
Along the way, you’ll also learn the fundamentals of TFT graphics programming, making this project both educational and fun.
What You Will Learn
By the end of this tutorial, you will know how to:
✔ Interface an ST7735 TFT display with Arduino Mega
✔ Install and use the required libraries
✔ Display text on the TFT screen
✔ Draw lines, circles, rectangles, and custom graphics
✔ Create simple animations
✔ Build a personalized romantic greeting display
Components Required
| Component | Quantity |
|---|---|
| Arduino ( I am using Mega 2560) | 1 |
| 1.8-inch ST7735 TFT Display | 1 |
| Jumper Wires | As required |
| USB Cable | 1 |
Understanding the ST7735 TFT Display
The ST7735 is one of the most popular low-cost color TFT displays available for Arduino projects.
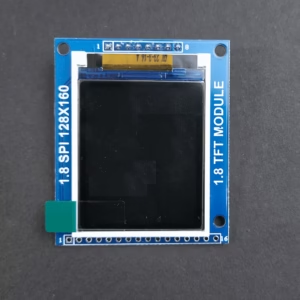
Features of ST7735 TFT Display Arduino Tutorial
- Resolution: 128 × 160 pixels
- Full-color display
- SPI communication
- Fast graphics rendering
- Low power consumption
The display can show:
- Text
- Graphics
- Icons
- Menus
- Sensor data
- Animations
This makes it ideal for embedded systems and DIY electronics projects.
ALSO READ – How to Use PT-100 RTD with MAX31865 Module and Arduino
TFT Display Pinout
Typical ST7735 TFT modules have the following pins:
| TFT Pin | Function |
|---|---|
| VCC | Power |
| GND | Ground |
| SCK | SPI Clock |
| SDA | SPI Data |
| CS | Chip Select |
| DC | Data/Command |
| RST | Reset |
| LED | Backlight |
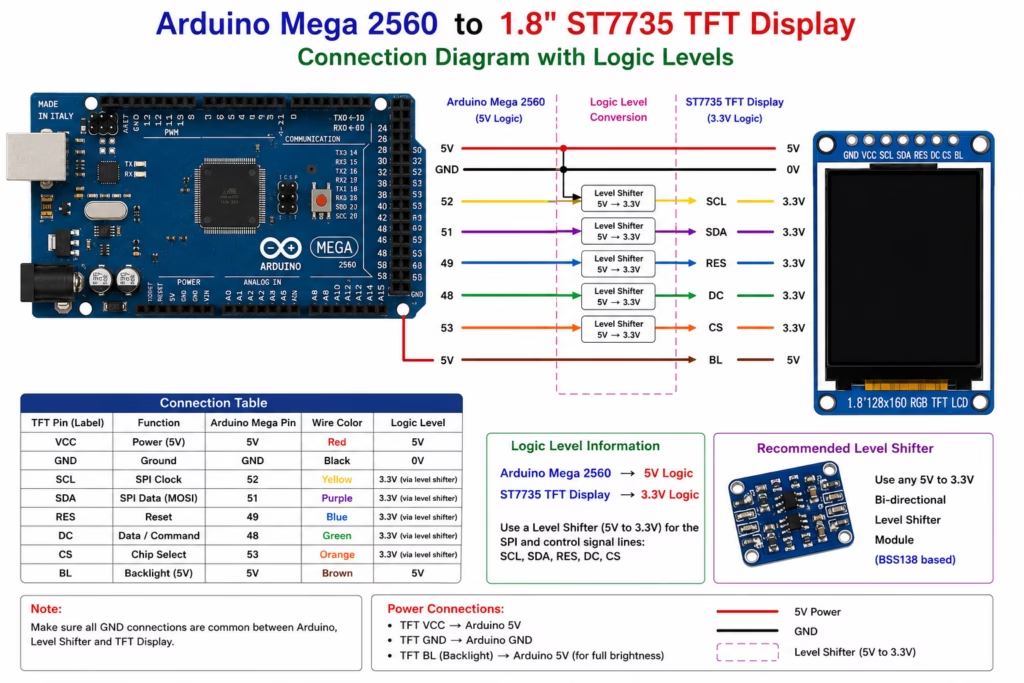
NOTE: Need of level shifter depend on the type of your TFT display. If your display works on 5V logic, then there is no need of logic shifter. You can directly make connections between pins of Arduino and TFT display.
Wiring the ST7735 TFT Display Arduino
| TFT Pin | Arduino Mega |
|---|---|
| VCC | 5V |
| GND | GND |
| SCK | 52 |
| SDA | 51 |
| CS | 53 |
| DC | 48 |
| RST | 49 |
| LED | 5V |
ALSO READ – PID Temperature Control with Arduino & Sensors
Installing Required Libraries
Open Arduino IDE and install:
Adafruit GFX Library
This library provides:
- Text functions
- Shape drawing functions
- Graphic utilities
Adafruit ST7735 and ST7789 Library
This library communicates directly with the display controller.
Install both from:
Sketch → Include Library → Manage Libraries
Also you can visit the library on github
Your First TFT Program
Let’s verify that the display works correctly.
#include <SPI.h>
#include <Adafruit_GFX.h>
#include <Adafruit_ST7735.h>

#define TFT_CS 53
#define TFT_DC 48
#define TFT_RST 49

Adafruit_ST7735 tft(TFT_CS, TFT_DC, TFT_RST);

void setup()
{
  tft.initR(INITR_BLACKTAB);
  tft.setRotation(1);

  tft.fillScreen(ST77XX_BLACK);

  tft.setTextColor(ST77XX_GREEN);
  tft.setTextSize(2);
  tft.setCursor(20,40);

  tft.print("Hello!");
}

void loop()
{
}
Upload the sketch and verify that “Hello!” appears on the screen.
Congratulations! You have successfully interfaced the TFT display.
Displaying Colored Text
Different text colors can make your user interfaces more attractive.
Example:
tft.setTextColor(ST77XX_RED);
tft.print("Red Text");

tft.setTextColor(ST77XX_BLUE);
tft.print("Blue Text");
Supported colors include:
- Red
- Green
- Blue
- Yellow
- Cyan
- Magenta
- White
Drawing Shapes
The Adafruit GFX library allows drawing various shapes.
Draw Rectangle
tft.drawRect(10,10,100,50,ST77XX_YELLOW);
Filled Rectangle
tft.fillRect(10,10,100,50,ST77XX_RED);
Draw Circle
tft.drawCircle(80,60,20,ST77XX_GREEN);
Filled Circle
tft.fillCircle(80,60,20,ST77XX_BLUE);
Draw Line
tft.drawLine(0,0,160,128,ST77XX_WHITE);
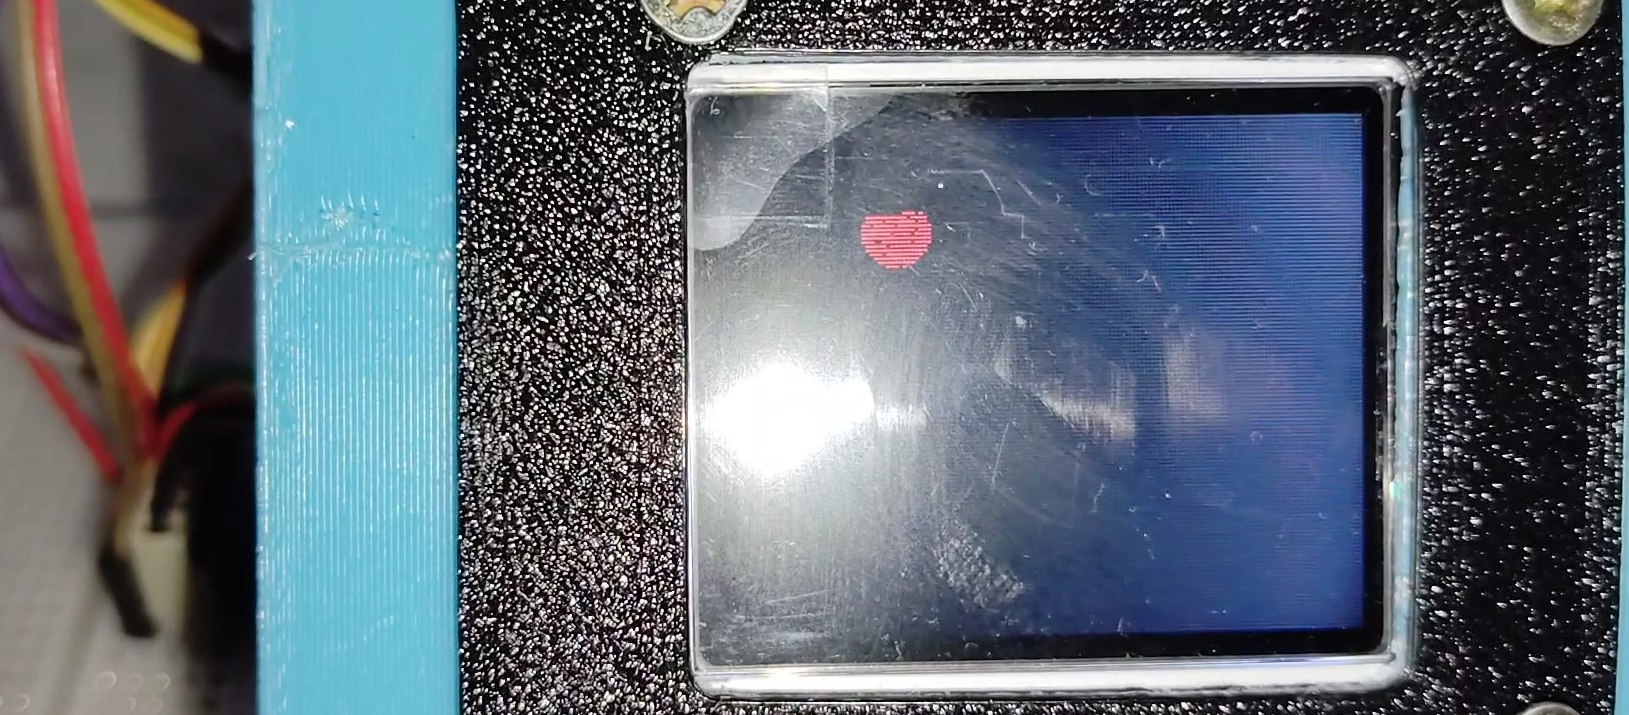
Creating a Heart Shape
A heart can be created using two circles and one triangle.
void drawHeart(int x,int y,int s,uint16_t color)
{
  tft.fillCircle(x-s,y-s,s,color);
  tft.fillCircle(x+s,y-s,s,color);

  tft.fillTriangle(
    x-2*s,y-s/2,
    x+2*s,y-s/2,
    x,y+3*s,
    color);
}
Now display a heart:
drawHeart(80,60,15,ST77XX_RED);
The result is a simple but beautiful heart graphic.
Creating Animation
Animation is simply the rapid display of slightly different images.
Example:
for(int i=12;i<18;i++)
{
  tft.fillScreen(ST77XX_BLACK);

  drawHeart(80,60,i,ST77XX_RED);

  delay(100);
}
The heart appears to grow.
By repeating the animation in both directions, we can create a beating-heart effect.
Project: Romantic Animated Greeting
Now let’s combine everything we have learned.
The display will:
- Show a personalized name
- Display animated hearts
- Present a loving message
- Create a memorable surprise
Example message:
“NAME, You Make Every Day Beautiful”
The animation can continuously run while the display remains powered.
This simple project often creates a much bigger emotional impact than expensive gifts because it is personal and handmade.
#include <SPI.h>
#include <Adafruit_GFX.h>
#include <Adafruit_ST7735.h>
#define TFT_CS 53
#define TFT_DC 48
#define TFT_RST 49
Adafruit_ST7735 tft = Adafruit_ST7735(TFT_CS, TFT_DC, TFT_RST);
//-------------------------------------
// Draw Heart Function
//-------------------------------------
void drawHeart(int x, int y, int s, uint16_t color)
{
tft.fillCircle(x - s, y - s, s, color);
tft.fillCircle(x + s, y - s, s, color);
tft.fillTriangle(
x - 2 * s, y - s / 2,
x + 2 * s, y - s / 2,
x, y + 3 * s,
color);
}
//-------------------------------------
// Twinkling Stars Background
//-------------------------------------
void stars()
{
for(int i=0;i<50;i++)
{
int x=random(0,160);
int y=random(0,128);
tft.drawPixel(x,y,ST77XX_WHITE);
}
}
//-------------------------------------
// Welcome Screen
//-------------------------------------
void welcomeScreen()
{
tft.fillScreen(ST77XX_BLACK);
stars();
tft.setTextColor(ST77XX_CYAN);
tft.setTextSize(2);
tft.setCursor(15,20);
tft.println("Hello");
tft.setTextColor(ST77XX_YELLOW);
tft.setCursor(15,50);
tft.println("NAME");
tft.setTextColor(ST77XX_GREEN);
tft.setTextSize(1);
tft.setCursor(10,95);
tft.println("A special message");
tft.setCursor(35,110);
tft.println("for you...");
delay(3000);
}
//-------------------------------------
// Floating Hearts Animation
//-------------------------------------
void floatingHearts()
{
for(int frame=0; frame<60; frame++)
{
tft.fillScreen(ST77XX_BLACK);
for(int i=0;i<10;i++)
{
int x = random(10,150);
int y = (frame*3 + i*20) % 160;
drawHeart(x,128-y,3,ST77XX_RED);
}
delay(60);
}
}
//-------------------------------------
// Beating Heart Animation
//-------------------------------------
void beatingHeart()
{
for(int cycle=0; cycle<6; cycle++)
{
tft.fillScreen(ST77XX_BLACK);
drawHeart(80,55,18,ST77XX_RED);
tft.setTextColor(ST77XX_MAGENTA);
tft.setTextSize(2);
tft.setCursor(25,100);
tft.print("I LOVE");
delay(250);
tft.fillScreen(ST77XX_BLACK);
drawHeart(80,55,22,ST77XX_RED);
tft.setTextColor(ST77XX_MAGENTA);
tft.setTextSize(2);
tft.setCursor(25,100);
tft.print("I LOVE");
delay(250);
}
}
//-------------------------------------
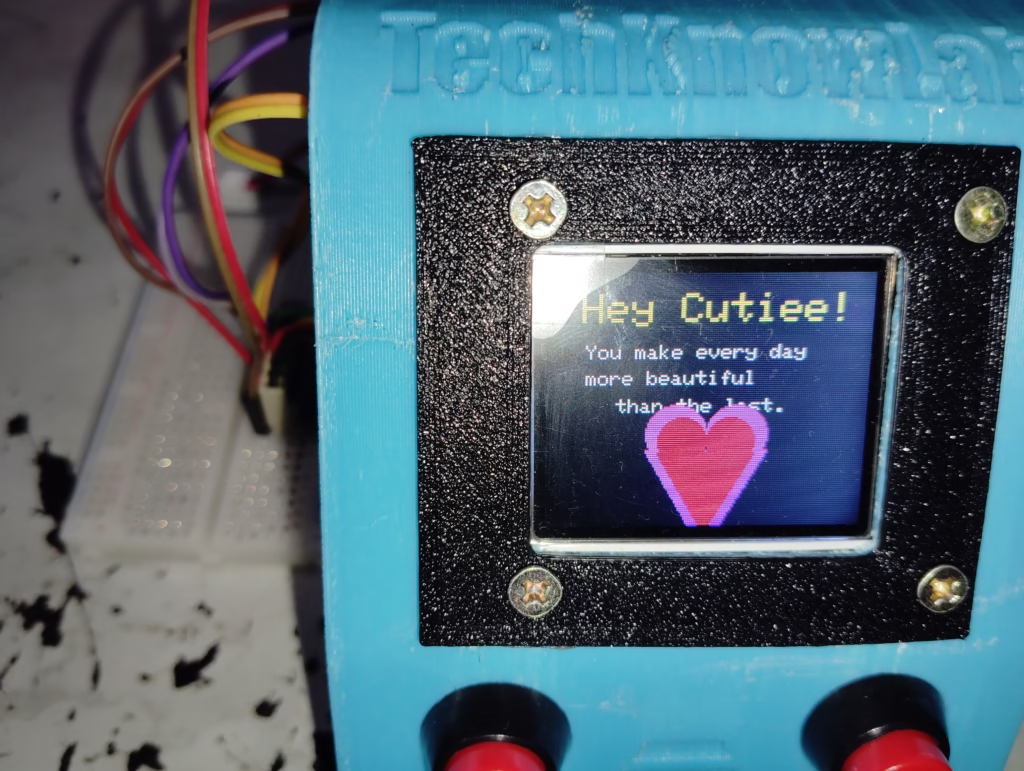
// Romantic Message
//-------------------------------------
void romanticMessage()
{
tft.fillScreen(ST77XX_BLACK);
stars();
tft.setTextColor(ST77XX_YELLOW);
tft.setTextSize(2);
tft.setCursor(10,10);
tft.print("NAME");
tft.setTextColor(ST77XX_WHITE);
tft.setTextSize(1);
tft.setCursor(10,45);
tft.println("You make every day");
tft.setCursor(10,60);
tft.println("more beautiful");
tft.setCursor(10,75);
tft.println("than the last.");
tft.setCursor(10,100);
tft.println("Thank you for being");
tft.setCursor(10,115);
tft.println("part of my life.");
delay(5000);
}
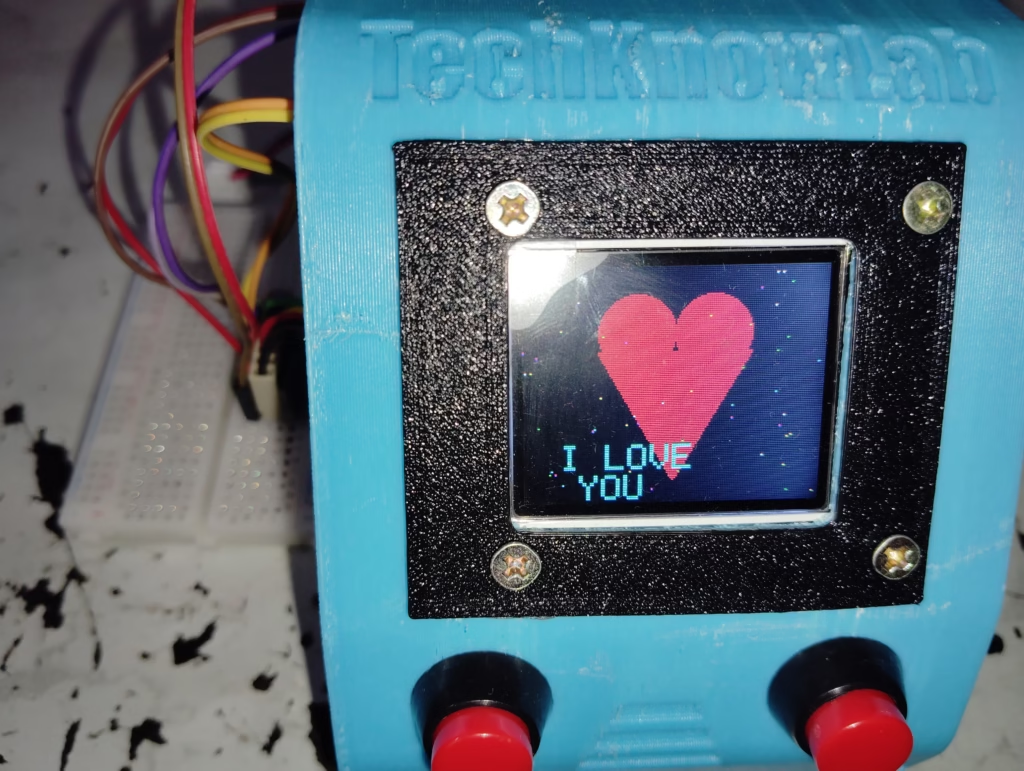
//-------------------------------------
// Big Love Screen
//-------------------------------------
void finalScreen()
{
tft.fillScreen(ST77XX_BLACK);
drawHeart(80,45,25,ST77XX_RED);
tft.setTextColor(ST77XX_CYAN);
tft.setTextSize(2);
tft.setCursor(18,90);
tft.print("I LOVE");
tft.setCursor(18,110);
tft.print("YOU");
delay(3000);
tft.fillScreen(ST77XX_BLACK);
tft.setTextColor(ST77XX_MAGENTA);
tft.setTextSize(2);
tft.setCursor(10,35);
tft.print("Forever");
tft.setCursor(10,65);
tft.print("& Always");
tft.setCursor(20,105);
tft.print("NAME");
delay(4000);
}
//-------------------------------------
// Setup
//-------------------------------------
void setup()
{
randomSeed(analogRead(A0));
tft.initR(INITR_BLACKTAB);
tft.setRotation(1);
}
//-------------------------------------
// Main Loop
//-------------------------------------
void loop()
{
welcomeScreen();
floatingHearts();
beatingHeart();
romanticMessage();
finalScreen();
}
Example Codes
Bouncing Ball Animation
#include <SPI.h>
#include <Adafruit_GFX.h>
#include <Adafruit_ST7735.h>

#define TFT_CS 53
#define TFT_DC 48
#define TFT_RST 49

Adafruit_ST7735 tft(TFT_CS, TFT_DC, TFT_RST);

int x = 80;
int y = 64;
int dx = 2;
int dy = 2;
int r = 8;

void setup() {
  tft.initR(INITR_BLACKTAB);
  tft.setRotation(1);
}

void loop() {

  tft.fillScreen(ST77XX_BLACK);

  tft.fillCircle(x, y, r, ST77XX_RED);

  x += dx;
  y += dy;

  if (x >= 160-r || x <= r)
    dx = -dx;

  if (y >= 128-r || y <= r)
    dy = -dy;

  delay(20);
}
Starfield Animation (Space Effect)
#include <SPI.h>
#include <Adafruit_GFX.h>
#include <Adafruit_ST7735.h>

#define TFT_CS 53
#define TFT_DC 48
#define TFT_RST 49

Adafruit_ST7735 tft(TFT_CS, TFT_DC, TFT_RST);

void setup() {

  tft.initR(INITR_BLACKTAB);
  tft.setRotation(1);

  randomSeed(analogRead(A0));
}

void loop() {

  int x = random(160);
  int y = random(128);

  tft.drawPixel(x, y, ST77XX_WHITE);

  delay(10);

  tft.drawPixel(x, y, ST77XX_BLACK);
}
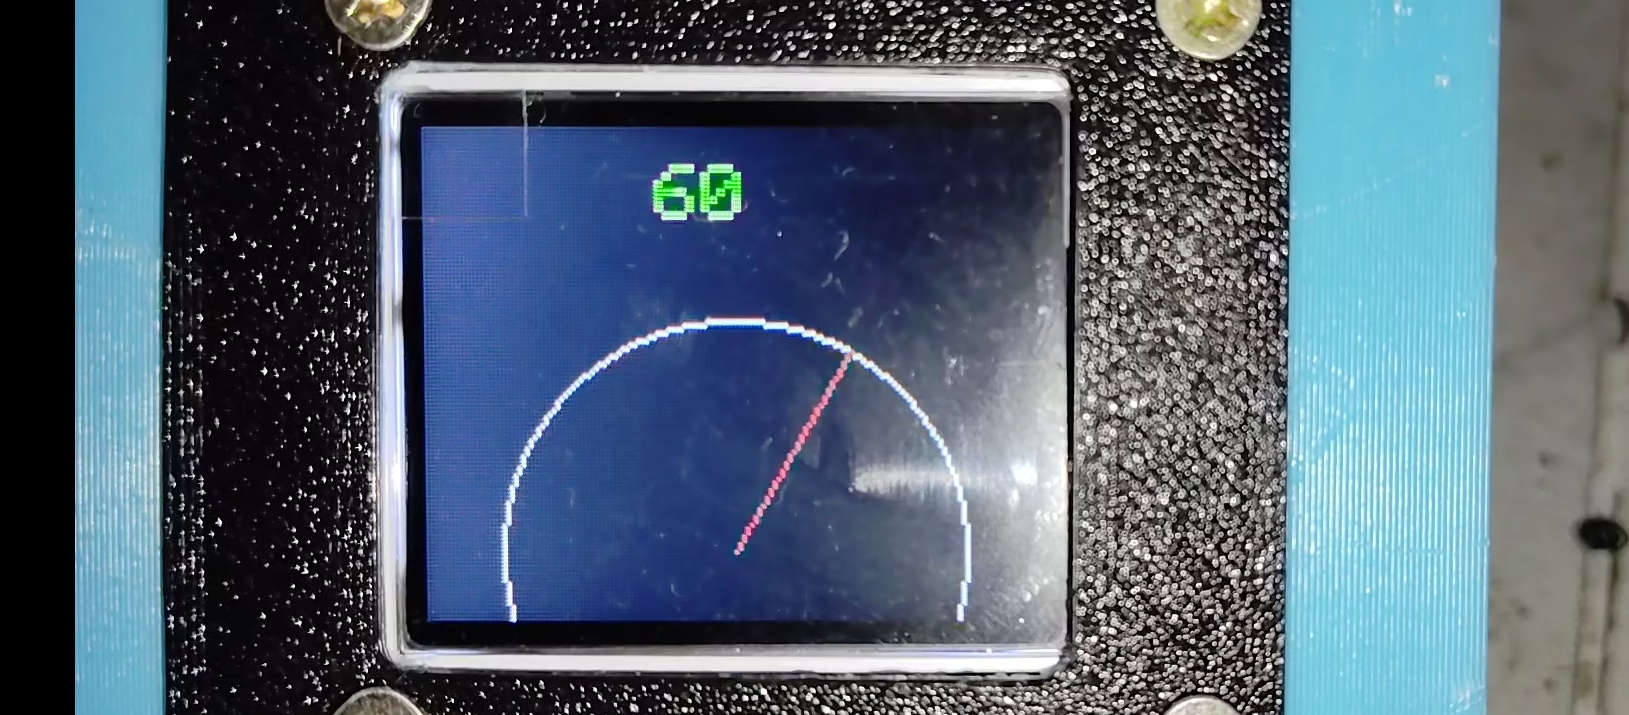
Analog Speedometer
Useful for future sensor projects.
#include <SPI.h>
#include <Adafruit_GFX.h>
#include <Adafruit_ST7735.h>
#include <math.h>

#define TFT_CS 53
#define TFT_DC 48
#define TFT_RST 49

Adafruit_ST7735 tft(TFT_CS, TFT_DC, TFT_RST);

void drawNeedle(int angle)
{
  tft.fillScreen(ST77XX_BLACK);

  int cx = 80;
  int cy = 110;
  int r = 60;

  tft.drawCircle(cx, cy, r, ST77XX_WHITE);

  float rad = radians(angle);

  int x = cx + r*cos(rad);
  int y = cy - r*sin(rad);

  tft.drawLine(cx, cy, x, y, ST77XX_RED);

  tft.setCursor(60,10);
  tft.setTextColor(ST77XX_GREEN);
  tft.setTextSize(2);
  tft.print(angle);
}

void setup() {

  tft.initR(INITR_BLACKTAB);
  tft.setRotation(1);
}

void loop() {

  for(int a=0;a<=180;a+=5)
  {
    drawNeedle(a);
    delay(50);
  }

  for(int a=180;a>=0;a-=5)
  {
    drawNeedle(a);
    delay(50);
  }
}
Matrix-Style Digital Rain
#include <SPI.h>
#include <Adafruit_GFX.h>
#include <Adafruit_ST7735.h>

#define TFT_CS 53
#define TFT_DC 48
#define TFT_RST 49

Adafruit_ST7735 tft(TFT_CS, TFT_DC, TFT_RST);

void setup() {

  tft.initR(INITR_BLACKTAB);
  tft.setRotation(1);

  tft.fillScreen(ST77XX_BLACK);

  randomSeed(analogRead(A0));
}

void loop() {

  int x = random(0,160);
  int y = random(0,128);

  char c = random(33,126);

  tft.setCursor(x,y);
  tft.setTextColor(ST77XX_GREEN);
  tft.setTextSize(1);
  tft.print(c);

  delay(20);
}
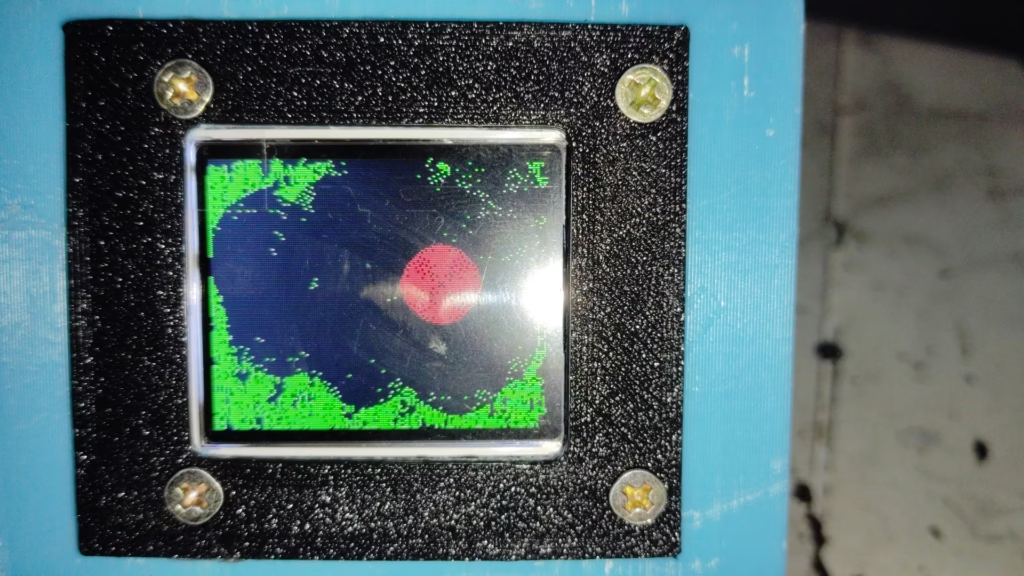
Fireworks Celebration Animation
#include <SPI.h>
#include <Adafruit_GFX.h>
#include <Adafruit_ST7735.h>

#define TFT_CS 53
#define TFT_DC 48
#define TFT_RST 49

Adafruit_ST7735 tft(TFT_CS, TFT_DC, TFT_RST);

uint16_t colors[] = {
  ST77XX_RED,
  ST77XX_BLUE,
  ST77XX_GREEN,
  ST77XX_YELLOW,
  ST77XX_CYAN,
  ST77XX_MAGENTA
};

void setup() {

  tft.initR(INITR_BLACKTAB);
  tft.setRotation(1);

  randomSeed(analogRead(A0));
}

void loop() {

  int cx = random(20,140);
  int cy = random(20,100);

  uint16_t color = colors[random(6)];

  for(int r=1;r<25;r++)
  {
    tft.drawCircle(cx,cy,r,color);
    delay(20);
  }

  delay(100);

  for(int r=1;r<25;r++)
  {
    tft.drawCircle(cx,cy,r,ST77XX_BLACK);
  }
}
15 Creative TFT Display Project Ideas for Arduino
Include ideas such as:
- Smart Plant Monitor
- Weather Station
- Data Logger Display
- Mini Oscilloscope
- Electronic Name Plate
- Digital Clock
- Pomodoro Timer
- TFT Game Console
- IoT Dashboard
- Temperature Monitor
- Flow Meter Display
- CNC Status Monitor
- 3D Printer Dashboard
- Electronic Greeting Card
- Romantic Message Display
Real-World Applications of TFT Displays
Although this tutorial uses a romantic greeting project, the same techniques are used in:
- Industrial control panels
- Data loggers
- Medical instruments
- Smart home systems
- IoT dashboards
- Weather stations
- 3D printer interfaces
Learning TFT graphics is an important step toward building professional embedded systems.
Conclusion
The ST7735 TFT display is one of the best displays for Arduino beginners because it allows you to create colorful and interactive projects with minimal hardware.
In this tutorial, you learned how to:
- Interface an ST7735 TFT display
- Display text
- Draw graphics
- Create animations
- Build a personalized romantic greeting project
Now it’s your turn. Try customizing the project with your own messages, colors, and animations and surprise someone special with a handmade electronic gift.
Sometimes a few lines of code can create memories that last much longer than the hardware itself.
Happy Making!
TechKnowLab – Prototyping the Ideas!
NEXT READ – HC-SR04 Arduino: How to use ultrasonic sensor with Arduino