Temperature based Fan Speed Control using Arduino (Tinkercad Projects| Automatic Bike Engine Cooling)
Creating a temperature-based fan speed control system using Arduino can be a fun and useful project, especially for applications like automatic bike engine cooling. Below is a basic outline of the steps you can follow to implement this project using Tinkercad, a virtual platform for simulation.
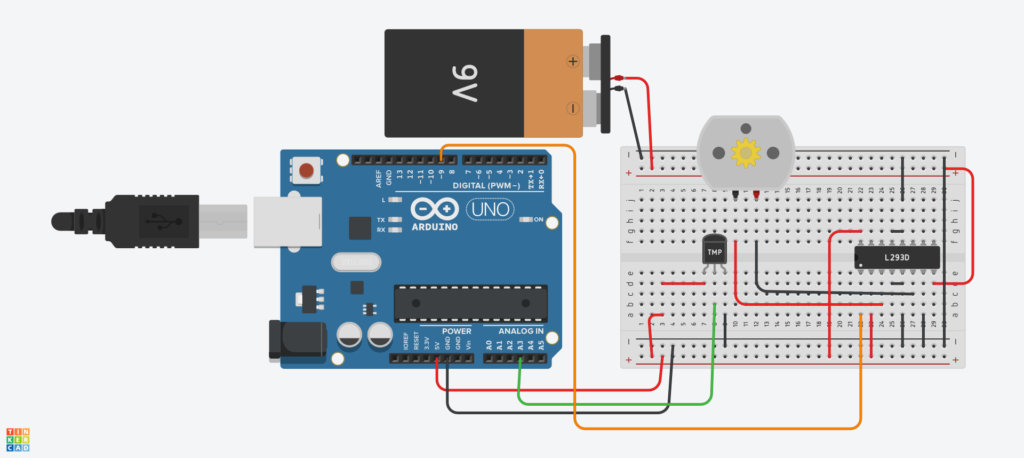
Components Required
- Arduino Board (e.g., Arduino Uno)
- Temperature Sensor (e.g., LM35)
- Motor or Fan
- NPN Transistor (e.g., 2N2222)
- Resistors (for LM35 and transistor biasing)
- Diode (for protecting the transistor)
- Breadboard and jumper wires
Also Read: Automatic Wire Cutting Tool
Circuit Connections
Connect the LM35 temperature sensor to the Arduino:
- LM35 VCC to Arduino 5V
- LM35 GND to Arduino GND
- LM35 OUT to Arduino Analog Pin A0
Connect the motor or fan to the Arduino via a transistor:
- Connect the collector of the transistor to the motor or fan.
- Connect the emitter of the transistor to the ground.
- Connect the base of the transistor through a resistor to a digital pin on the Arduino (e.g., pin 9).
Optionally, use a diode across the motor or fan to prevent voltage spikes
Arduino Code
 const int tempPin = A3;  // LM35 analog pin
const int fanPin = 9;   // Fan control pin

void setup() {
  Serial.begin(9600);
  pinMode(fanPin, OUTPUT);
}

void loop() {
  // Read temperature from LM35
  int sensorValue = analogRead(tempPin);

  // Convert the analog reading to temperature in Celsius
  float temperature = (sensorValue * 0.48828125); // 5/1024

  // Display temperature on Serial Monitor
  Serial.print("Temperature: ");
  Serial.print(temperature);
  Serial.println(" °C");

  // Adjust fan speed based on temperature
  if (temperature > 30) {
    analogWrite(fanPin, 255);  // Max speed
  } else if (temperature > 20) {
    analogWrite(fanPin, 128);  // Medium speed
  } else {
    analogWrite(fanPin, 0);    // Turn off the fan
  }

  delay(1000);  // Add a delay to avoid rapid changes
}Simulation in Tinkercad
- Create a new Tinkercad project.
- Add the components mentioned above to the workspace.
- Connect the components based on the circuit connections mentioned.
- Copy and paste the Arduino code into the Tinkercad Arduino editor.
- Simulate the project and observe how the fan speed changes based on the simulated temperature.
Remember to adjust the temperature thresholds and fan speed levels in the code according to your specific requirements and the characteristics of your cooling system.
Pingback: Automatic Wire Cutting Tool - TechKnowLab
Pingback: Stepper Motor Connection and Wiring - steppermotor.net