Speed up your Arduino Codes: Arduino is the one of the best platforms that allows users to build advanced embedded systems without having to dig deep into digital electronics or coding. This is because Arduino use something called Hardware Abstract level, or HAL, to simplify things.
Although Arduino offers a simple way of coding that can reach everyone, it also allows users to manipulate directly its ports which allows a lower level and faster manipulation of its I/O pins. This speeds up the execution of the code and reduce its size.
In this post, a way to significantly speed up the execution of Arduino Sketches using the port manipulation technique will be presented and discussed.
Speed up your Arduino Codes
Ports in ATMEGA328
ATMEGA328 IC used in Arduino boards has 3 different Ports labelled Port B, Port C and Port D.
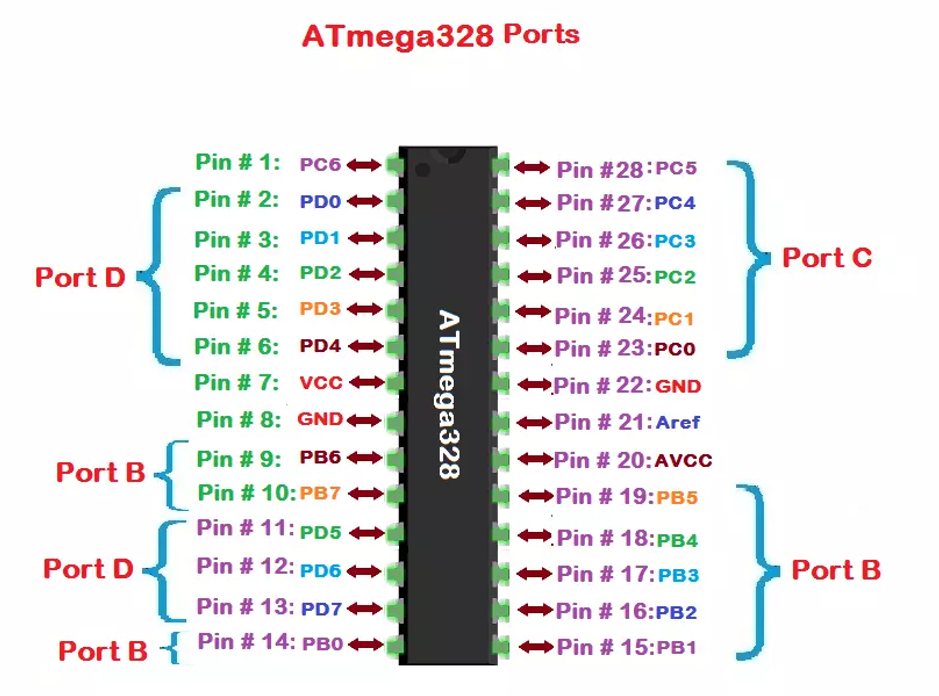
Each port is controlled by three registers, which are also defined variables in Arduino. The three registers are DDR, PORT, and PIN.
| REGISTER | FUNCTION |
| DDR | Determines whether the pin is an INPUT or OUTPUT |
| PORT | Controls whether the pin is HIGH or LOW |
| PIN | Reads the state of INPUT pins. |
Mapping between Ports & Arduino Pins
In Arduino IDE, ports of the IC are manipulated through their mapped digital pins on the board, for example, digitalWrite(8, HIGH) sets PBo (the lower bit of Port B) to HIGH.
So, in order find the port manipulation version of a digitalRead or digitalWrite, you must find out what physical pin the digital pin value is mapped to on the Arduino board.
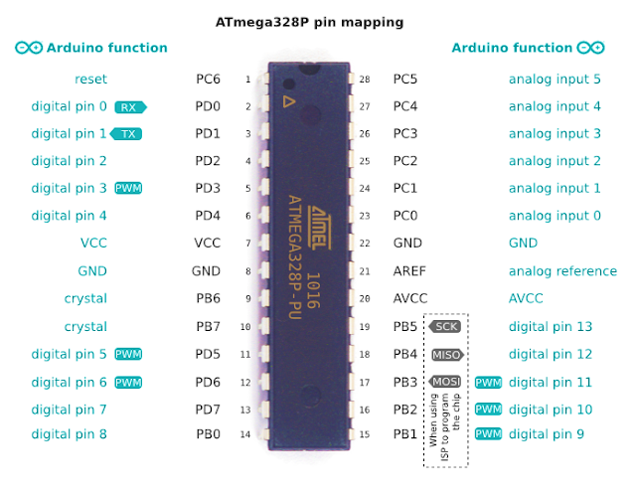
Pin mapping of the ATmega328 IC on the Arduino Uno
- PORTD (PDO-PD7) maps to Arduino UNO digital pins 0 to 7
- PORTB (PBO-PB5) maps to Arduino UNO digital pins 8 to 13
- PORTC (PCO-PCS) maps to Arduino UNO analog pins Ao to A5
Example of the Blink LED code: Suppose that we want to blink an LED connected to digital pin 4 of the Arduino UNO. Normally, the code will control the LED using digitalWrite(4, state) command, where state alternates each second between HIGH & LOW.
    void setup(){
    pinMode(4, OUTPUT);
    }

    void loop(){

    digitalWrite(4, HIGH);

    delay(1000);

    digitalWrite(4, LOW);

    delay(1000);
    }
Similarly we can perform other functions like – DC Motor Control, Stepper Motor Control, or reading data from any sensor.
Blink LED by Port Manipulation [Speed up your Arduino]
First, pin 4 on Arduino UNO is mapped over PD4, that is, pin 4 of PORT D. So, PD4 is the pin to control. Next, we need to declare this pin as input. To do so,
pinMode(4, OUTPUT)
will be replaced by:
DDRD = Bo0010000;
This will set all pins as inputs (which is their default state) except for pin 4.
Here B means binary, O refers to output and 1 to input. If more than one pin is used, you can declare them all as inputs or outputs by using one command only. For example, if you want to set digital pins 2, 3, 4, 5 and 6 as output and digital pins 0, 1 and 7 as inputs, you can use one DDRD=B01111100; command only:
Then,
digitalWrite(4, HIGH);
is replaced by:
PORTD |= (14);
which will OR (I=) the current states of the pins of PORT D with a “1” shifted 4 places to the left, which will leave the other pins unaffected. Thus, “oring” the states of PORT D with the binary value (00010000). This will set pin 4 of PORT D to HIGH. 5V will be output on pin 4 of the UNO.
To turn the LED off, PD4 should be set to LOW. This can be done by replacing
digitalWrite(4, HIGH)
by
PORTD &= ~(1<<4);
which will take a logic”1″, shift it 4 places to the left, then invert it using the “~” sign and finally “AND” it with the bits of PORT D. All bits of PORT D will be multiplied by “1”, thus remain unaffected excpet for pin 4 which will be multiplied by a 0. 5V will be output on pin 4 of the UNO.
Final Code [ Speed up your Arduino]
The code will be as follows:
    void setup(){

    DDRD = B00010000;

    }

    void loop(){

    PORTD |= (14);

    delay(1000);

    PORTD &= ~(14);

    delay(1000);

    }
Final Notes on Speed up Arduino Codes
First, it is clear that using the port manipulation technique can lead to much faster and reduced codes. Multiple actions can be done in one command only. However, The code is much more difficult to debug and maintain, and is a lot harder for other people to understand. One can take a lot of time and effort to master this technique.
Pingback: How to Use Multiple SPI Devices on an Arduino - TechKnowLab